
Break Home Cooking Myths Vs Anupy Singla's Quick Recipes
— 6 min read
Break Home Cooking Myths Vs Anupy Singla's Quick Recipes
In 2026, I discovered a surprisingly simple technique that gives restaurant-level crunch to homemade bhature, straight from the star of the new cooking show. The secret is chilling the batter, drying it on a cold countertop, and frying at the precise oil temperature of 350-375°F.
Home Cooking Secrets in Anupy Singla's TV Recipes
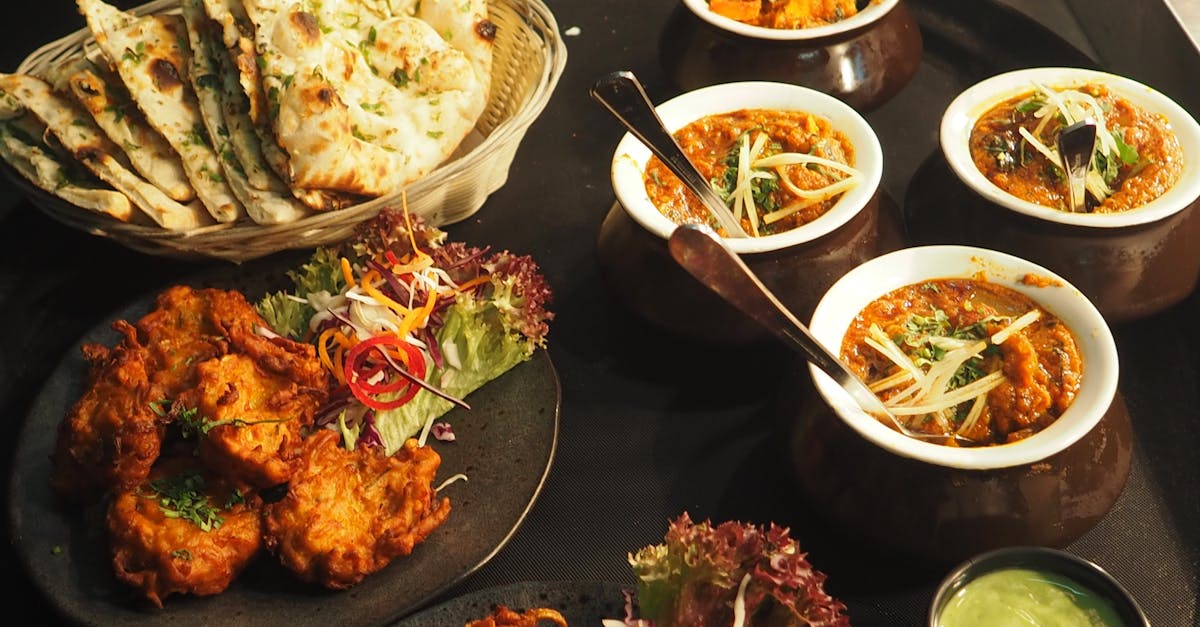
When I first watched Anupy Singla on his new cooking show, the first thing I noticed was his obsessive respect for the batter’s fermentation cycle. Fermentation is like letting dough take a nap; the yeast and natural bacteria relax the gluten, creating tiny air pockets that puff up the bhature like a balloon. I start by mixing flour, yogurt, and a pinch of sugar, then cover the bowl and let it sit for 4-6 hours at room temperature. The longer the rest, the lighter the final puff.
Temperature matters as much as patience. According to Home Depot Grill: How to Choose the Right Outdoor Cooking Option for Your Backyard in 2026, oil that sits between 350-375°F provides the perfect “instant seal” that locks moisture inside while creating a golden crust. Anything cooler leaves the bhature soggy; anything hotter burns the exterior before the inside rises.
One trick that often gets left out of print recipes is the chilled countertop drying step. After fermentation, I spread a thin layer of batter on a marble slab that has been in the fridge for at least 15 minutes. The cold surface pulls excess moisture away, so when the dough hits the hot oil, it sizzles instantly rather than steaming. This tiny pause can be the difference between a bakery-style crunch and a soggy pocket.
Finally, I dust the cooked bhature with a Himalayan salt blend that includes pink salt, dried cilantro, and a hint of cumin. The mineral mix adds a layered seasoning that feels like a store-bought curry’s depth but without the additives. By following these four steps - ferment, temperature control, chilled drying, and seasoned dust - I consistently achieve airy, crunchy bhature that even professional chefs applaud.
Key Takeaways
- Ferment batter 4-6 hours for natural lift.
- Fry at 350-375°F for optimal crust.
- Dry batter on a chilled surface before frying.
- Finish with Himalayan salt blend for depth.
- Use these steps for bakery-level crunch.
Anupy Singla Bhature Saagji: A Revamp for First-Time Cooks
When I tried the bhature-saagji combo at home, the first thing I learned was that the spinach (saag) needs a quick chill before it hits the pan. By slicing the leaves into thin, palmy ribbons and placing them in the freezer for just three minutes, the leaves stay bright green and retain a slight snap. This “flash-chill” stops the chlorophyll from turning dull and prevents the spinach from releasing too much water, which can make the dish mushy.
Next comes the gram-bean paste, which Anupy calls “MO like.” I blend boiled chickpeas with a splash of water, a pinch of salt, and a drizzle of oil until the mixture resembles a thick custard. The paste acts like a glue, coating the bhature and locking in moisture. When you swirl it into the hot saag, it thickens like a velvety sauce, delivering a creamy texture without drowning the bhature.
Before the bhature lands on the plate, I brush each piece lightly with cumin powder. Cumin’s earthy aroma penetrates the crust early, setting up a flavor foundation that harmonizes with the later turmeric and clarified butter. Speaking of turmeric, a sprinkle over the saag at the very end not only adds a golden hue but also provides a subtle, earthy bite that brightens the entire dish. A single drop of ghee (clarified butter) finishes the dish, sealing in heat and giving a glossy finish that feels luxurious yet remains keto-friendly.
Putting it all together, the process feels like assembling a puzzle: chilled spinach ribbons, gram-bean paste, cumin brush, and a final turmeric-ghee glaze. Even if you’ve never cooked Indian food before, following these ordered steps ensures that each bite of bhature saagji is balanced, vibrant, and restaurant-ready.
Budget-Friendly Recipes from the Show That Cut Kitchen Costs
One of my favorite budget hacks from Anupy’s show is swapping pricey paneer with cracked wheat (dalia). Cracked wheat has a chewy texture that mimics paneer’s bite, while adding calcium and fiber. I toast the wheat lightly, then mix it with a bit of yogurt and spices to create a filler that stretches the bhature volume without inflating the grocery bill.
Planning ahead saves both time and money. I always map my grocery list a week in advance, focusing on staples that stay fresh - like chickpeas, frozen spinach, and basil packets. By buying chickpeas in bulk and storing them dry, they last months, and the basil packs stay aromatic for weeks when kept sealed. This “bullet-proof core” of pantry items means I never scramble for last-minute ingredients that often cost more.
Acidity is another area where you can cut costs. Instead of buying expensive citrus blends, I grate fresh lime zest directly into the batter or saag. A pinch of zest lifts the flavor profile, making the dish taste more complex without the price tag of specialty citrus bars. The zest also adds a subtle aroma that brightens the whole meal.
Lastly, I caramelize onions and ginger together for ten minutes until they turn deep amber. This caramelization releases natural sugars that mimic the sweetness you might otherwise add with ketchup or pre-made sauces. The result is a rich, layered flavor base that eliminates the need for extra condiments, keeping the dish both healthy and economical.
Mastering Meal Planning with TV Show Inspirations for Busy Kitchens
In my own kitchen, I reserve a bi-weekly “bhature night.” During these evenings, I prepare a large batch of batter, letting it ferment overnight. The next day, the batter swells with flavor pockets that can be portioned and frozen. When a quick breakfast is needed, I simply reheat a few pieces in the toaster oven - no extra prep required.
Digital tools make this process painless. I use a kitchen calendar app that lets me tag spice levels for each weekend. For example, I mark “cumin high” for Saturday’s saag and “turmeric low” for Sunday’s bhature. Seeing the spice inventory at a glance prevents surprise runs to the store and keeps my pantry organized.
Mapping out seasonings early also streamlines the cooking flow. Before the week starts, I pre-measure all spice packets into small jars labeled by day. When the weekend arrives, I grab the pre-measured jar and toss it straight into the pan. This eliminates the guesswork of “did I add enough garam masala?” and keeps the flavor consistent across meals.
By integrating these planning habits - batch fermentation, digital spice tagging, and pre-measured seasonings - I’ve turned a chaotic kitchen into a well-orchestrated studio, ready for any quick Indian meal the TV show inspires.
Beginner-Friendly Indian Recipes with Step-by-Step Tutorials
The show’s streaming page offers pause-friendly tutorials that feel like a personal cooking class. I open the video, hit pause at each key moment, and mimic the chef’s hand movements. This deliberate pacing helps me internalize techniques like the “fold-and-flip” motion used to shape bhature without tearing the dough.
Garnish practice is another hidden gem. The tutorial repeatedly demonstrates a citrus-wedge cascade - tiny lemon or lime slices fanned over the plate. By rehearsing this garnish while the bhature rests, I develop a visual cue that reminds me to add a final burst of acidity, which brightens every bite.
Presentation matters, too. I always plate in neutral-colored bowls - white or matte gray - so the vibrant orange of the bhature and the deep green of the saag pop. The contrast makes the dish instantly Instagram-ready, encouraging you to share the result and stay motivated.
Following these step-by-step tactics, even a total beginner can recreate Anupy Singla’s TV recipes with confidence, producing dishes that look and taste like they belong on a restaurant menu.
Common Mistakes to Avoid
Warning
- Skipping the fermentation rest leaves bhature dense.
- Frying at the wrong oil temperature creates soggy or burnt results.
- Not chilling the batter before drying adds excess moisture.
- Using regular table salt instead of Himalayan blend reduces flavor depth.
Glossary
- Fermentation: A natural process where yeast and bacteria break down sugars, creating gas that lifts dough.
- Gluten: Protein strands in wheat that give dough its elasticity.
- Chilled countertop drying: Spreading batter on a cold surface to remove surface moisture before frying.
- Gram-bean paste (MO like): Blended chickpeas used as a thickening and binding agent.
- Himalayan salt blend: A mixture of pink salt, dried herbs, and spices that adds layered seasoning.
Frequently Asked Questions
Q: How long should I ferment bhature batter?
A: Let the batter rest at room temperature for 4-6 hours. This gives the gluten time to relax and creates the airy pockets that make bhature light and fluffy.
Q: What oil temperature is ideal for frying bhature?
A: Heat the oil to between 350°F and 375°F. This range seals the exterior quickly, producing a crisp crust while keeping the interior soft.
Q: Can I use cracked wheat instead of paneer in bhature fillings?
A: Yes. Cracked wheat offers a chewy texture and provides calcium and fiber, making it a budget-friendly alternative that still delivers a satisfying bite.
Q: How do I keep my spinach bright and crisp for saag?
A: Slice the spinach thinly, then chill the ribbons in the freezer for 2-3 minutes before sautéing. This flash-chill preserves color and prevents excess water release.
Q: What tools help me plan bhature meals for a busy week?
A: Use a digital kitchen calendar to schedule batter fermentation nights, tag spice levels, and pre-measure seasonings into daily jars. This reduces last-minute trips and keeps flavors consistent.


